Mastering Harsh Lighting
- Oct 30, 2020
- 4 min read
When you find yourself wanting to snap a photo in very bright lighting situations, you have several options to avoid having people stare directly into the sun (resulting in squinty, closed eyes) or having split lighting on people’s faces (half the face blown out in full sunlight, half the face in shadows). Try out these tips at home and tag me in your posts when you get them to work!
Tip #1: Find your light source (the sun), and put it behind your subjects so that the light on the front of their bodies is even. Make an extra effort to create even lighting on their faces, because our eyes always look at faces first!


Left: Image SOOC (straight out of camera). Right: Edited image- Contrast boosted, shadows brightened, exposure up. Color hues changed and saturation increased to match my editing style.
How to make Tip #1 a success:
Try not to put the sun directly behind the subject’s head, unless you’re pretty experienced and you’re going for an artistic sun flare/starburst in your image.
If you can, shoot at a downward angle to avoid haze. You can do this by bringing along a little step stool to get higher than your subjects, finding a rock or a log to climb onto, or having the subjects sit down. You can also use a lens hood, your hand, or a piece of paper to block the sun rays from streaming directly into your lens.


Left: Image SOOC. Right: Edited image
Shooting at a downward angle can help reduce haze.
If you’re on a camera where you can control the settings, shoot on manual and underexpose the image to preserve detail in the highlighted background. If you’re on a phone, tap the background to make your phone adjust the exposure for the brightest part of the image. Fix the dark subjects with your editing app or software.
When you edit the photo: Start by brightening up the shadows to lighten up your subject’s face. Boost the contrast slightly if there’s haze, and/or use the dehaze slider if you have one. Bring up the exposure as needed.


Potential consequences of using Tip #1:
Flyaway hairs: Flyaways will be very evident. This is usually a pretty easy fix in Photoshop, but also try to catch any flyaways and smooth them down before you snap your photo.
Halo heads: Your subjects may look like their heads have a little bit of a glowing halo. The halos don't bother me- I actually kind of like them because they look angelic.


Left: Image SOOC. Right: Edited image. Having a cute hat on hand can reduce halo heads and flyaway hairs!
Tip #2: Embrace that sunshine! Turn your subjects toward your light source so that they are fully facing it. Then have them turn their bodies and faces 90 degrees so that just the sides of faces towards you are in full sun.


How to make Tip #2 a success:
This tip works well for couples or parents with kids- you can have them turn in towards each other in a close embrace, or have them turned the same direction with one person’s arms wrapped around the other person.
If you’re working with a single subject, try thoughtfully and artfully posing them. For example, have your subject look down with just their eyes, bringing a hand up to gently brush their fingers through their hair.

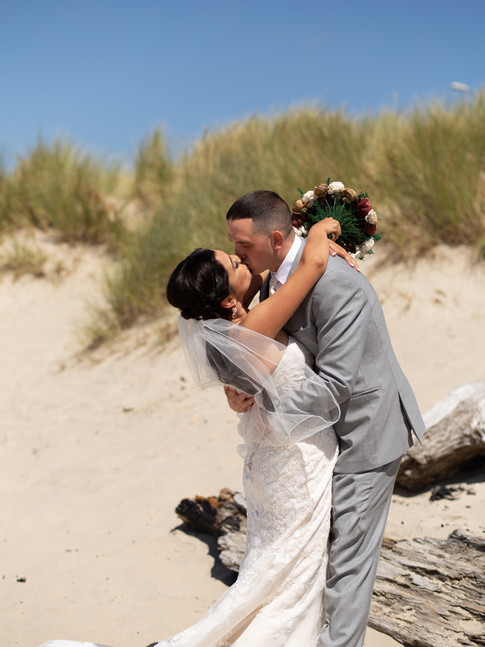


This tip would generally yield more of a profile shot, but your subject wouldn’t be squinting directly into the sun. If you're shooting a wedding, it's a great time to tell your couples to close their eyes, touch noses, and just breathe.
Remember: Underexpose to preserve highlights on your subject's face.


Tip #3: Find or create shade.
How to make Tip #3 a success:
Try to avoid dappled light- using trees with sparse branches and leaves for your shade, as this can cause the light on your subject to be uneven and splotchy.
A good rule of thumb when finding shade is to try to put the sun behind your clients for more even light, just as we did in Tip #1.
If you don't have shade, create some! If you have two subjects, use the taller person to create a shadow on the shorter person. Turn your taller person's back to the sun. Have the shorter person stand in the taller person's shadow, being sure to get their face fully covered. OR use a hat, as suggested in Tip #1.


Left: Image SOOC. Right: Edited image.
You can't see the sun in the photo set above, but you can tell where it is based on two big giveaways:
1. The direction of the shadows on the ground.
2. The highlights on Keate's shoulder/neck and Natalie's hair.
How I composed this image: First, I turned Keate's back to the sun because he is taller and bigger than Natalie. Second, I positioned Natalie in Keate's shadow so that most of the light was blocked from her face and body. Then I had them walk toward me very slowly, telling them to try to move in synchronized motion (which made them laugh, because it's no easy feat)!
Remember: If you can't control the angle you shoot from or change your subject's position, underexpose to preserve the highlights and just do your best to capture emotion! You can still get beautiful images that document joy and connections, even with the sun beating down hard.


Left: Image SOOC. Right: Edited image from a full sunlight wedding where I was unable to direct posing. I also had limited ability to change where I was standing.
I hope these tips reduce your fear of taking photos in the middle of the day when the sun is high and bright! These tips are meant as guidance only- you still need to practice to really perfect them and make them work for your equipment and editing style! Be sure to tag me if you use any of these tips so that I can see how they're working for you!
-Brenna


Comments